Internet Connection Sharing (ICS) enables a Windows computer to share its Internet connection with computers on local area networks. It's been around since Windows 98 SE, and with the launch of Windows XP, it's only gotten better.
Windows Vista or XP ICS has some notable advantages over the versions of ICS in Windows 98 Second Edition and Windows Me:
It's easier to set up. There's no software to install, and it doesn't add any network components or protocols.
It's much more reliable and much less likely to cause network problems.
You can create a Network Bridge connecting two or more local area networks and share the Internet connection with the computers on all of them. This is especially useful if your XP computer is connected to both a wired and wireless network.
ICS client computers can use XP's Internet Gateway to monitor and control the server computer's Internet connection. If you have a dial-up connection, you can connect and disconnect when deciding whether to enable ICS.
However, XP ICS is missing some features of those earlier versions. You can't disable the DHCP server, change the server computer's IP address, or change the range of addresses allocated by the DHCP server.
Consider these points when deciding whether to enable ICS.
WARNING #1: When you enable ICS, the network adapter connected to the local area network is assigned a static IP address of 192.168.0.1. The client computers are assigned other IP addresses in the 192.168.0.x range. These addresses may not be compatible with an existing network
WARNING #2: Don't enable ICS if any computer in your network is configured as a domain controller, DHCP server, or DNS server. Don't enable it if another computer is running ICS or Network Address Translation (NAT).
WARNING #3: To enable ICS, you must be logged on as a user that is a member of the Administrators group.
WARNING #4: If you establish a Virtual Private Networking (VPN) connection while sharing a different connection, the client computers won't be able to access the Internet until the VPN connection is ended.
Preparing for ICS
The ICS server computer must have two network connections: one for the Internet, and one for the local area network. The Internet connection may be a dial-up (PPP or ISDN), cable modem, DSL, or other broadband Ethernet connection. The LAN connection may be a wired, wireless, or even a USB Ethernet connection. Before enabling ICS:
Set up your Internet connection and test it so that you know you can connect to the Internet.
Decide whether to allow client computers to control the server's Internet connection using the Internet Gateway. This feature is automatically available on clients running Windows XP. On clients running Windows 98, Windows 98 Second Edition, or Windows Me, you must run XP's Network Setup Wizard to enable the gateway. If you have a Windows XP CD-ROM, you can run the Wizard from it. Otherwise, create a network setup disk containing the Wizard files.
Enabling ICS on the Server Computer
You can enable ICS either manually or by using XP's Network Setup Wizard.
To use the Wizard, see our page on Server Setup Using the Network Setup Wizard. You must use this method if you need to create a network setup disk.
You can also enable ICS manually for a dial-up Internet connection or enable ICS manually for a broadband Internet connection.
Configuring ICS Client Computers
Now configure the other networked computers as ICS clients. Follow these links for computers running Windows 95 or Windows 2000 Professional. For Windows 98, Windows 98 Second Edition, Windows Me, or Windows XP, stay with these instructions for XP Client Wizard.
How to enable Internet Connection Sharing?
Setup procedures
To enable Internet Connection Sharing on a network connection, follow theses steps:
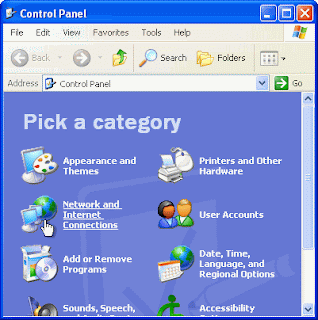
1.Click Start, click Control Panel, and then double-click Network Connections.
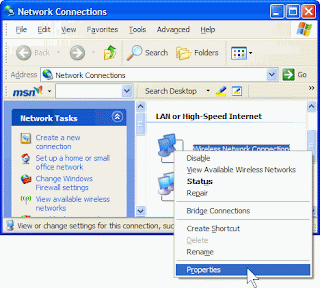
2.Click the local area network (LAN) connection or click the dial-up networking connection that you want to share (that is, the one that connects to the Internet), and then under Network Tasks, click Change settings of this connection.
3.On the Advanced tab, click to select the Allow other network users to connect through this computer's Internet connection check box.
4.If this is a dial-up networking connection, and you want the connection to be automatically dialed when another computer on your network tries to connect to the Internet, click to select the Establish a dial-up connection whenever a computer on my network attempts to access the Internet check box.
5.If you want to permit other network users to enable or to disable the shared Internet connection, click to select the Allow other network users to control or disable the shared Internet connection check box.
6.Under Internet Connection Sharing in Home networking connection, select the connection that connects the computer that is sharing its Internet connection to the other computers on your network.
Note that to enable Internet Connection Sharing in Windows XP, you must have administrative rights.
Important: When you enable Internet Connection Sharing, the network adapter that is connected to the home network or to the small-office network receives a new static IP address of 192.168.0.1, with a subnet mask of 255.255.255.0. Existing TCP/IP connections on the network may be lost and must be reestablished.

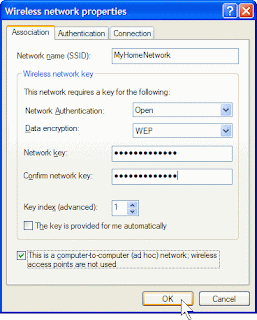
 7. On the Wireless Networks tab, under Preferred networks, click Add.